I love to entertain and try new recipes. This is a way for me to share some of the recipes I have tried and what I have thought of them. I hope you enjoy it and let me know if there are some recipes you would like me to try.
Showing posts with label Appetizers. Show all posts

Saturday, 2 April 2016

Cauliflower Ranch Chips

With the prices on cauliflower these days I like to get it when it is on special.  I was at my favourite Farm market and they had some on clearance for 99 cents a head so I grabbed a couple because I had a few recipes I wanted to try (but not on a $5.00 a head cauliflower).
I am always looking for ways to have a healthish but different snack and I think this falls into the healthy category.  Everyone enjoyed it so I will be making them again and playing with different herb/spice combinations, especially when the herbs in my garden are ready.
They are the perfect snack size so I know they will make it into the lunch box if there are any left by Monday.
My first attempt I made them about 1/4 of an inch thick, they are very nice but if you would like a crispier version I would make them fairly thin.

Cauliflower Ranch Chips

1 head of cauliflower
3 cups grated romano cheese
4 eggs
1 1/2 tsp dill
1 1/2 tsp parsley
1 1/2 tsp chives
1 1/2 tsp basil
1 tsp onion powder
1 tsp garlic powder
freshly ground black pepper
  1. Use a food processor to turn the cauliflower into a coarse crumble (grating it would also work).
  2. Mix together the herbs and spices in a large bowl.
  3. Toss the cauliflower crumble and cheese in with the herb mixture.
  4. Beat the eggs and add to the cauliflower mixture.  You don't want this mixture to be wet, just moist enough so it stays together.
  5. On a parchment lined baking sheet place a heaping 1 tbsp of the mixture and flatten with a fork.  Have them spaced about 1 inch apart.  Bake a 450 for 7-10 minutes and then flip them over and return them to the oven for another 7-10 minutes (or until they have reached your desired crispness).

Saturday, 26 December 2015

Poulet Dijonnaise

This is a fantastic recipe my mom has been making for years and I have always enjoyed it.  I love the richness of the flavour and how easy it is to prepare. It is wonderful because you can make full size portions or appetizer size portions.  This is a great one to make in advance to freeze in whatever portion size you need.  If you are going to freeze them, wrap them individually and freeze them before baking them in the phyllo dough. When you take it out of the freezer, reheat frozen at 425 for 25 minutes.
The recipe below is how to make it in an oven but I have also done this in a crockpot by putting the chicken, dijon, whipping cream, salt and pepper in.  I cooked it on high for about 4 hours and then pulled the chicken breasts apart with forks.

Poulet Dijonnaise

6 boneless, skinless chicken breasts1/4 cup Dijon mustardpan juices from cooked chicken2 cups whipping cream salt and white pepper16 sheets of phyllo dough, defrosted1 cup butter1/2 cup dry bread crumbs
  1. Season chicken breasts. Place in a baking dish and cover with foil. Bake at 350 degrees F for 40-50 minutes (or until just cooked).  
  2. Remove meat, cool, skin and cut into small pieces. 
  3. Remove excess fat from pan juices, add mustard and deglaze over medium-high heat, stirring constantly. 
  4. Gradually stir in light cream, salt and pepper. 
  5. Lower heat and cook slowly until the liquid is reduce by one-quarter. 
  6. Add chicken to sauce. Set aside and cool.  (I take out the phyllo pastry at this point)

Rectangular Single Servings

Butter one layer of phyllo, top with a second layer. Butter second layer. and sprinkle with a few bread crumbs. Place one-eighth of filling in rectangle about two inches from the narrow end of phyllo closest to you.  Fold two-inch end over the chicken filling. Smooth right and left-end edges down. Then fold left and right sides up to centre of the rectangle of filling. Butter the new unbuttered sides you have exposed. Sprinkle the same with bread crumbs.  Then finish rolling the individual serving up ensuring that the last edge is placed face down on the cooking sheet. Brush with butter. Bake at 400 degrees for about 15 - 20 minutes.  

Triangles

Butter one sheet of phyllo and sprinkle with bread crumbs. Envision vertical lines at the 1/3 and 2/3 marks of a vertical sheet of phyllo.  Fold left third over the centre third, then fold the right third, over the centre. Place a spoon full of filling into the bottom corner of the new three-layer piece of phyllo.  Fold diagonally, triangle over triangle, as if folding a flag. Place seam side down (Cut off any extra left after the last fold)


Sunday, 23 November 2014

Curried Cream Cheese Spread

My in-laws are often away for the holidays so we will often celebrate Christmas with them before they leave.  This year my mother-in-law made a wonderful spread that we couldn't seem to get enough of. I asked her for the recipe and made it for our annual Wine and Cheese potluck and everyone seemed to enjoy it as well.  It is a very simple recipe she got from a friend of hers but I am sure it will be come one of my go to appetizers.
The amounts for the spices are just a guide, you can add more or less depending on your personal tastes.  Just remember if you make it ahead of time that the flavour will develop with time.  This dish can be served cold or at room temperature with crackers or what ever you like.

Curried Cream Cheese Spread

250 grams soft cream cheese
1 tbsp mango chutney
1 tbsp curry powder
1 tbsp ground cumin
red pepper jelly
dried red currents or craisins
toasted pine nuts
  1. Combine the cream cheese, chutney and spices. Cream together with a spoon or a fork until thoroughly mixed.  Put this mixture into the dish you plan on serving it in.
  2. Top the cream cheese mixture with a layer of red pepper jelly.
  3. Mix together enough of the pine nuts and dried fruit to cover the top of the spread.  Add to the top of the spread.

Wednesday, 4 December 2013

Roasted Garlic and Acorn Squash Strudel

I have been looking for the perfect opportunity to try this recipe for a while now and it finally came.  My inlaws were coming for dinner and they are always up for trying something new. They also don't mind keeping the little one entertained while I work in the kitchen.  Plus they were the ones who grew the squash I used.
This recipe will be a fall staple for me in the future I am sure, especially in years where I have a lot of squash to use up.  I will likely double the recipe and freeze half of the filling for later because it will not add much extra time.  The time consuming part of this recipe is preparing the phyllo for the filling to go into.  Depending on how patient you are and how flakey you like your strudels will be the main determinate in how long the last step takes you.
It is a very versatile strudel that could be use for many different purposes depending on the portion size.  This recipe could easily be adapted to use different types of squash or different spices.

Roasted Garlic and Acorn Squash Strudel

1 head roasted garlic
2 small acorn squash
olive oil
salt and pepper
1/4 cup fresh chopped sage leaves
1/4 tsp grated nutmeg
1 cup ricotta
1/3 cup toasted pine nuts
1/2 box phyllo dough, thawed
1 tbsp butter
3 tbsp olive oil
  1. Preheat the oven to 350.  
  2. Cut and gut the squash. Place in a baking dish cut side up and sprinkle with olive oil, salt and pepper. Have a quarter inch of water in the dish to help prevent the squash from drying out.  Bake for about an hour or until the squash flesh is cooked through (You can roast the garlic at the same time as you bake the squash).
  3. Scrape the insides of the acorn squash out with a fork and mash it well with a fork.
  4. Squeeze the garlic cloves out of the paper into a bowl and mash it with a fork.  
  5. Place in a frying pan over medium heat and add the sage leaves.  Fry until fragrant and then add the squash.  Once this mixture is cooked through set it aside to cool slightly.
  6. In a bowl, combine the squash mixture, nutmeg ricotta and pine nuts.  Stir well and add additional seasoning if desired.
  7. Preheat the oven to 400. 
  8. Melt the butter and olive oil together.  On a clean working surface lay out your first sheet of phyllo and brush the butter mixture over it.  Alternate the phyllo and butter mixture until you have about 10 layers.  
  9. Spread roughly a third of the squash mixture into the centre of the phyllo.  Make sure to leave about an inch on the edges.  Then roll up from the long side and tuck the ends in.  Transfer onto the baking sheet and repeat with the other two.
  10. Bake for 20 minutes or until they are golden and crispy.  

Tuesday, 3 December 2013

Phyllo Bites

This past weekend my husband and I had our annual wine and cheese potluck and I thought I would try a couple new recipes.  I love those little phyllo bites that you can get and I figured they couldn't be too hard to make.    I decided to find a recipe and make them.
As I was making them, I remembered when I was planning my wedding and meeting with the caterer not understanding why the canapés were so pricey.  The caterer said it is the labour involved in making them that makes them expensive.  After making these phyllo bites I understand, they are pretty labour intensive but they taste great.  I will make them again but not for times when I have a lot of guest to feed.
When assembling these it is not an exact science so don't get too picky about making sure there are exact measurements in each bite.  Just try to have even amounts of the cheese and the preserve of your choice.  Remember not to make these too last minute.  It took me about 20 minutes to assemble 48 bites and then another 15 minutes for them to bake.
*Remember when working with phyllo to keep a damp cloth over the sheets you are not using to prevent them from drying out. 

Phyllo Bites

12 sheets phyllo pastry (thawed)
1/2 cup melted butter
2 cups cream cheese or brie
1 jar of your favourite preserve
  1. Preheat the oven to 375.
  2. Place one sheet of phyllo on your work surface and using a pastry brush lightly apply the butter.  Repeat with two more sheets.
  3. Cut lengthwise into three equal parts and then cross wise into quarters to make 12 squares.
  4. Spoon about a teaspoon of the cheese you are using and the preserve onto each square.
  5. Gather the corners and sides of each square together and gently twist the top together.
  6. Place on a cookie sheet and repeat with each bite.
  7. Bake for 15 minutes or until they are a nice golden colour.


Wednesday, 10 July 2013

Red Current Compote

I love currents and at the farm we have about 15 red current bushes.  This year we have collected quite the harvest.  This year we decided to pick the sprays off the bushed and because of the heat we would remove the individual currents in the cool of our home.  We had 12 litres of sprays to process so we enlisted the help of my in-laws to help us with the task.  They were awesome and we had a lovely couple of hours talking while working.  Before we started I thought it would be nice to bribe them with some baked brie cheese and a red current compote.  It was such a hit some individuals (not mentioning any names) mopped up their plates and the serving bowl in order to make sure there was not any wasted.
This recipe is simple and very enjoyable.  Depending on how many people you are planning to feed with it, you may want to double the recipe.  It goes well with meats as well as cheese and can be used as a spread for bread.

Red Current Compote

1 1/2 cups red currents
6 tbsp red wine
4 tbsp sugar
2 tbsp butter
2 tsp corn starch
  1. Combine the ingredients into a sauce pan over medium heat. Stir it while it comes to a boil.
  2. Reduce the heat and continue stirring until it reaches the desired consistancy. 

Tuesday, 30 April 2013

Warmed Marinated Olives

For as long as I can remember I have been a huge fan of olives.  Normally I will just but them already marinated, bulk at the grocery store.  I came across this recipe in one of my cookbooks and thought it would be easy enough to make so I thought I would give it a try.  They were very easy to make and the flavour was amazing.  It is a perfect appetizer for the summer and really wows guests.

Warmed Marinated Olives

1/2 cup picholine olives
1/2 cup moroccan olives
1/2 cup nicoise olives
1 orange
1 lemon
2 sprigs fresh thyme
1 clove minced garlic
1 tbsp extra virgin olive oil
  1. Rinse the olives under cold water to remove any brine.  Pat them dry with paper towels.
  2. Remove the zest from half of the orange in long thin strips with a citrus zester. Remove the zest from half of the lemon as well.
  3. In a bowl toss the olives with the olive oil, garlic, thyme, orange and lemon zest.
  4. Before serving, sauté them over medium-low heat.  Just enough to bring out their flavours and gently warm them.

Wednesday, 24 April 2013

Roasted Garlic and Onion Hummus

I have always enjoyed hummus and found it to be a great way to have some extra protein.  The other day I was eating some hummus with my sister and she had mention how she once bought a caramelized onion hummus that was amazing but hasn't been able to find it since.  I thought that it must be easy enough to make a similar hummus to what she was talking about so I decided to search online for a recipe.  It didn't take me long to find a recipe to try.
It was very simple to follow this recipe and the end result tasted great!  So great that my husband decided to lick the bowl clean so that none of it was wasted.
A thought we had while eating the hummus was they only problem with this one is the time it takes to roast the garlic and onions for the recipe.  Then I thought that it would be easy enough to make enough for a couple of batches for the hummus at once and then freeze.  All you would have to do would be defrost the onion and garlic and through the rest of the ingredients into the blender.  Next time I make it I plan on trying this.  I will let you know how it works out.

Roasted Garlic and Onion Hummus

4 heads of garlic
1 large onion
1-2 tbsp vegetable oil 
1 can chick peas, rinsed
1/3 cup tahini
3 tbsp lemon juice
  1. Preheat the oven to 400.
  2. Cut off the tops of the heads of garlic and remove any of the papery skins from the sides.  Place them each individually on a sheet of tinfoil and drizzle with the vegetable oil before wrapping them up.
  3. Peel and cut the onion into 1/2 inch slices and place them onto a piece of tinfoil.  Drizzle with the oil and wrap it up.
  4. Place the garlic and onion foil packets onto a cookie sheet and bake for about 45 minutes or until they begin to brown.
  5. Once the garlic has cooled squeeze out the cloves into a dish.
  6. In a food processor, combine the garlic, onion, chickpeas, tahini and lemon juice.  Process until it reaches the desired consistency.

Friday, 21 December 2012

Cucumber Cocktail Shrimp

During the holiday season it is always nice to have simple recipes that can be thrown together easily but still looks and taste great.  This is another recipe that I grew up having at Christmas time and I enjoyed helping my mom make.  If there are seafood lovers at an event you are hosting this one is a hit and goes fast.

Cucumber Cocktail Shrimp

1 bottle cocktail sauce
2 english cucumbers
2 packages shelled shrimp
3 tbsp lemon juice
fresh parsley
  1. Wash and cut the cucumber into one inch rounds.  With a melon baller scoop out some of the seeds but do not go all the way through.
  2. Spoon cocktail sauce into the little bowl you have made in the cucumber.
  3. Toss the shrimp with lemon juice and some chopped fresh parsley.
  4. Place shrimp on top of the cocktail sauce.
  5. Place a parsley leaf on top of the shrimp.
  6. Arrange on a plate and serve.

Spinach Dip

This dip is one my family has been making for years and it is always a hit at the parties we bring it too.  It is also often requested as well.  I think it is a great standby for if you are not feeling to creative or if you are in a rush.  Most of the ingredients are ones that you can keep in your house for a last minute event.  It is easy to through together and one that can be made in advance.  It also is a fairly healthy recipe and goes well with veggies so you can make a batch and use it for your lunches and snacks through out the week.
For serving it at a party, buying a sour-dough round and carving it into a bowl always looks great and provides dippers but bowl is fine too.  The dippers that I commonly use are veggies, bread, crackers and chips but I am sure there are plenty of others you can use.

Spinach Dip

2 packages frozen chopped spinach (thawed)
1 package Knor's Vegetable Soup Mix
500 ml plain unsweetened yogurt
1 can water chestnuts
tabasco sauce to taste (optional)
  1. In a bowl mix together the yogurt and soup mix.
  2. Squeeze out the excess water from the spinach and add to the bowl.
  3. Drain and rinse the water chestnuts.  Chop them up into small pieces and add them to the bowl.
  4. Mix everything together and taste, if you would like to add some spice put in tabasco sauce to your liking.
  5. Serve with your choice of veggies or keep in the fridge.

Sunday, 2 December 2012

Drunken Chorizo Sausage

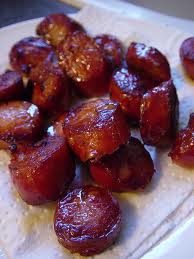
This is another family favourite at Christmas time.  This is a great tasting impressive appetizer that doesn't require much as far as ingredients and preparation goes but vanishes quickly when it is put out.  I like that it is one that I can make in advance and keep it warm in the oven for when guests arrive.

Drunken Chorizo Sausage

1 Chorizo or Garlic Sausage
1 bottle of red wine
3 or 4 minced garlic cloves
toothpicks for serving
  1. Cut the sausage into into 1/2 inch slices.
  2. In a frying pan, put the sausage, garlic and wine and allow it to simmer over medium heat.  As the wine is absorbed, add more until you achieve the flavour you desire.
  3. Serve on toothpicks hot.  You can keep them in a dish in the oven if you make them ahead of time.

Friday, 30 November 2012

Nuts and Bolts

For me, it just isn't Christmas without Nuts and Bolts.  They have always been a staple and I can't remember a Christmas without them and I hope I never will!

Tomorrow, my husband and I are having our annual Wine and Cheese Potluck so I thought I had better make a batch to prepare for the party.  I love how simple they are and how good they taste.
For storing I always have them in a ziplock freezer bag and store them either in the fridge or the freezer.

Nuts and Bolts

1 box Shreddies
1 box Cherios
1 bag Pretzel sticks
2 boxes Cheese Nibs
1 large bottle of Worcestershire sauce 
1 lb butter
garlic powder, onion powder and tabasco sauce to taste
  1. Preheat the oven to 200.
  2. Mix the first four ingredients in a large roasting pan.  If it isn't big enough, use two.
  3. Melt the other ingredients in a pot.
  4. Pour the melted mixture over the dry ingredients and mix thoroughly.
  5. Place in the oven and cook for 1and 1/2 to 2 hours, stirring every 20 minutes.
  6. Lay out on newspaper covered table to absorb some of the excess liquid.
  7. Store in freezer bags in the fridge or freezer.

Tuesday, 13 November 2012

Spiced Stuffed Mushroom Caps

I am a sucker for stuffed mushroom caps and they would be a weekly menu item at my house if they were a little healthier.  I usually make them when I have some mushrooms in the fridge that need to be used up.
I wanted to stray from my regular recipe so I looked online and found this one.  It was a little on the spicy side for my liking but that would be simple enough to fix but cutting the amount of cayenne pepper in them.  I hope you like them.

Spiced Stuffed Mushroom Caps

12 whole fresh mushrooms
1 tbsp vegetable oil
1 tbsp minced garlic
1 (8 oz) package of cream cheese
1/4 cup grated parmesan cheese
1/4 tsp ground black pepper
1/4 tsp onion powder
1/4 tsp ground cayenne pepper


1.
Bring a large pot of lightly salted water to a boil. Add ziti pasta, and cook until al dente, about 8 minutes; drain.
2.
In a large skillet, brown onion and ground beef over medium heat. Add spaghetti sauce, and simmer 15 minutes.
3.
Preheat the oven to 350 degrees F (175 degrees C). Butter a 9x13 inch baking dish. Layer as follows: 1/2 of the ziti, Provolone cheese, sour cream, 1/2 sauce mixture, remaining ziti, mozzarella cheese and remaining sauce mixture. Top with grated Parmesan cheese.
4.
Bake for 30 minutes in the preheated oven, or until cheeses are melted.

Saturday, 11 August 2012

Raincoast Crisps


I have enjoyed eating crisps for a since they have been on the market, they are amazing to enjoy with different cheeses and spreads.  My only problem is that at close to $8.00 a box they are not very economical and it is very easy to eat through the box quickly.  This year I have made some wonderful savoury jams and I decided to feature them with some brie as an appetizer last night when we had friends over.  I also thought it would be a great time to experiment and try making my own crisps.  If they turned out it would be great, otherwise I had other crackers on hand to take the place.
I searched online for recipes and I came across a few that were very similar and looked promising so I thought I would try two of them first.  I was amazed at how easy they were to make and how well they turned out.
I made one of the recipes with regular whole wheat flour and the other one with a combination of whole wheat flour, rice flour, spelt flour and chick pea flour.  I wanted to see if my guest preferred one over the other as far as the texture went and they enjoyed both of them and did not seem to have a preference.  This excited me because next time I make it I will try making a gluten free version because it will allow my sister a chance to enjoy these wonderful crisps!
An added bonus to these recipes is that before baking them a second time to turn them into the crisps they are frozen and this means you can make a double batch or use mini loaf pans to save some for another day.  Once you take them out of the freezer it takes about 25 minutes for them to be ready to use.

Fruit and Nut Raincoast Crisps (recipe with a blend of flours)

2 cups of a mix of flours (I used whole wheat, spelt, chick pea and rice)
2 tsp baking soda
1/2 tsp salt
2 cups butter milk
2 tbsp sugar
2 tbsp honey, maple syrup or molases
1 cup mix of seeds and or nuts (I used flax seeds, sesame seeds, poppy seeds and pine nuts)
1 cup dried fruit or mixture of dried fruit (I used raisins)
  1. Preheat the oven to 350 F and grease 2 regular loaf pans or 6 mini loaf pans.
  2. In a large bowl mix together the flours, baking soda and salt.  Since I used a blend of flours I wanted to make sure I really blended them together well.
  3. Add the buttermilk, sugar and honey and mix.
  4. Add in the seeds, dried fruit and nuts and gently combine.
  5. Divide evenly into the different pans and bake for about 35 minutes or until it passes the toothpick test.
  6. Take the loaves out of the pans and wrap in plastic wrap and freeze for at least an hour.  This makes it easier to slice the loaves thinly.
  7. Once the loaves are partially frozen slice them thinly and then arrange them on a cookie sheet.
  8. Bake them again at 300 F for 12 minutes, then flip the crisps over and bake for another 8 minutes.
  9. Allow them to cool before serving and store the extra in an air tight container.
The original recipe can be seen here. 

Cranberry Hazelnut Raincoast Crisps

2 cups flour
2 tsp baking soda
1/2 tsp salt
2 cups buttermilk
1/4 brown sugar
1/4 honey (or maple syrup or molases)
1 cup cranberries
1/2 cup hazelnuts
1/2 cup roasted pumpkin seeds
1/4 cup flax seeds
1/4 cup sesame seeds
1 tbsp chopped fresh rosemary 
  1. Preheat the oven to 350 F and grease 2 regular loaf pans or 6 mini loaf pans.
  2. In a large bowl mix together the flour, baking soda and salt.  
  3. Add the buttermilk, brown sugar and honey and mix.
  4. With a few swift stokes add the cranberries, hazelnuts and seeds.  Combine until just blended.
  5. Divide evenly into the different pans and bake for about 35 minutes or until it passes the toothpick test.
  6. Take the loaves out of the pans and wrap in plastic wrap and freeze for at least an hour.  This makes it easier to slice the loaves thinly.
  7. Once the loaves are partially frozen slice them thinly and then arrange them on a cookie sheet.
  8. Bake them again at 300 F for 12 minutes, then flip the crisps over and bake for another 8 minutes.
  9. Allow them to cool before serving and store the extra in an air tight container.

The original recipe can be viewed here.

Wednesday, 8 August 2012

Blueberry Thyme Compote

This recipe is one of my mother-in-laws summer specialties!  It is one she had adapted from a recipe she found in a magazine years ago and she now wings it so each time it may be a little different but it tastes great.  She usually serves it with brie cheese that has been heated on the barbecue on top of a cedar plank.  The paring goes so well and is a wonderful appetizer on a hot summers day.
This is the basic recipe but feel free to experiment by adding different herbs and spices to the mix.

Blueberry Thyme Compote

4 cups blueberries
1 cup sugar
1 orange, zested and juiced
3 sprigs thyme
  1. Combine the ingredients in a pot and boil together until it reachers the desired consistency.
  2. Serve warm with your choice of cheeses and a bagette.
***You can always add extra blueberries in while you warm it up to serve.

Wednesday, 1 August 2012

Pea and Broad Bean Humous

I have to thank my in-laws for helping me decide on trying this recipe, it had caught my eye before but I was always on the fence as to whether to try it because there were so many other recipes to try and we only grew enough broad beans for about 3 meals during the summer.  Yesterday my in-laws stopped by after a big harvest at their allotment and gave me a grocery bag full of peas and broad beans.  It was a pleasant surprise and I knew exactly what to do with them.

Pea and Broad Bean Humous

2 cups fresh peas (podded)
2 cups fresh broad beans (podded)
4 tbsp olive oil
2 cloves peeled garlic
2 lemons zested, juice from 1
2 tbsp extra virgin olive oil
  1.  Put a pot of salted water on to boil, once it boils add the peas and beans.  Cook for 3 minutes and then cool under cold water. Drain thoroughly again.
  2. Put the 4 tbsp of oil in a pan, heat gently and add the garlic.  Cook for 3 minutes, very very gently, until the oil has infused and the garlic has softened but not changed colour.
  3. In a food processor, blend the peas, beans and most of the zest.  Add the garlicky oil slowly as it processes.  
  4. Add the cloves of garlic, almost all of the lemon juice and 1 tbsp of extra virgin olive oil.  Blend some more.  The humous should be swirling around the sides of the bowl, with not too fine of a texture.  Scrape down the sides if you need too.
  5. Season with salt, pepper and lemon juice to taste.
*** This goes great on some nice artisan bread with some goat cheese.
Link to the original recipe.

Thursday, 21 June 2012

Spiced Chickpeas

I found this recipe when flipping through a cookbook that I had not used yet.  I was determined to try a recipe out of it and this is the one I choose.  I am glad I did because it was a hit with the couple we had over for dinner.  It is definitely one I will be making again.  I also think it would be fun to experiment with different spice blends.

Spiced Chickpeas

3 tbsp peanut oil
2 cups canned chick peas, drained and patted dry
3 tbsp sugar
2 tsp ground cumin
2 tsp coarse salt
1 tsp red pepper flakes
1) Preheat the oven to 300 F.
2) In a heavy bottomed skillet, heat oil over medium high heat. Add chickpeas and sprinkle sugar over them. Saute, tossing frequently, until chickpeas are golden brown, 5-7 minutes
3) Using a slotted spoon, transfer chickpeas to a rimmed baking sheet. Sprinkle with Salt, Cumin, and red pepper flakes and toss gently to coat. Roast until chickpeas are crisp and dry, 50-60 minutes. Let cool before serving.