I love to entertain and try new recipes. This is a way for me to share some of the recipes I have tried and what I have thought of them. I hope you enjoy it and let me know if there are some recipes you would like me to try.

Wednesday 26 December 2012

Apple Braised Brussel Sprouts

One of my guilty pleasures while I am taking a study break is to look at some of the gossip magazine websites.  When I was looking through one of them this fall I came across this recipe and decided that I would like to try it.  I wasn't 100% sure if I would like how they turned out so I thought it would be best to make them for a bunch of people so that if I didn't like it I wouldn't be stuck eating all of them (I know, not very thoughtful of me but I am very particular in what I like).  I decided Christmas dinner would be the perfect opportunity to try them out because brussel sprouts are a family favourite and a must for Christmas dinner.
The sprouts turned out great! They were such a hit that they were the first thing to be finished off.  I definitely plan on using this recipe again and I am tempted to try adding some onions in with it.  I will let you know how it turns out when I get around to making them again.
This recipe isn't exact, it is one you need to use your judgement on how much you need to feed your guests.

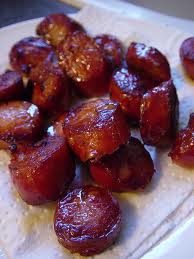
Apple Braised Brussels Sprouts

Brussel Sprouts
Grape seed oil
Apple Juice
Butter
Salt and pepper to taste
  1. Wash the brussel sprouts and cut about a third of the bottom off.  Discard one outer layer of leaves and then peel off a couple of layers into a separate bowl to use later.  Then cut the brussel sprouts hearts in half.
  2. Heat the oil in a large pan on high.  Add the halved brussel sprout hearts and toss frequently to lightly brown the sides.  After a minute or two turn down to medium.  Remove them from pan when they are crisp and tender.  Pat them off with paper towel and place in a serving dish.
  3. Add the apple juice and butter to the pan and allow it to reduce by half.  Once it has reduced add in the leaves that you saved from the first step and braise them in the liquid.
  4. Spoon the leaves over top of the top of the hearts and toss them to coat with the liquid.  You will not need all of the liquid.
* The original video can be seen here, it may help to watch it if you need clarification on instructions or to get an idea about the portions.


Friday 21 December 2012

Cucumber Cocktail Shrimp

During the holiday season it is always nice to have simple recipes that can be thrown together easily but still looks and taste great.  This is another recipe that I grew up having at Christmas time and I enjoyed helping my mom make.  If there are seafood lovers at an event you are hosting this one is a hit and goes fast.

Cucumber Cocktail Shrimp

1 bottle cocktail sauce
2 english cucumbers
2 packages shelled shrimp
3 tbsp lemon juice
fresh parsley
  1. Wash and cut the cucumber into one inch rounds.  With a melon baller scoop out some of the seeds but do not go all the way through.
  2. Spoon cocktail sauce into the little bowl you have made in the cucumber.
  3. Toss the shrimp with lemon juice and some chopped fresh parsley.
  4. Place shrimp on top of the cocktail sauce.
  5. Place a parsley leaf on top of the shrimp.
  6. Arrange on a plate and serve.

Spinach Dip

This dip is one my family has been making for years and it is always a hit at the parties we bring it too.  It is also often requested as well.  I think it is a great standby for if you are not feeling to creative or if you are in a rush.  Most of the ingredients are ones that you can keep in your house for a last minute event.  It is easy to through together and one that can be made in advance.  It also is a fairly healthy recipe and goes well with veggies so you can make a batch and use it for your lunches and snacks through out the week.
For serving it at a party, buying a sour-dough round and carving it into a bowl always looks great and provides dippers but bowl is fine too.  The dippers that I commonly use are veggies, bread, crackers and chips but I am sure there are plenty of others you can use.

Spinach Dip

2 packages frozen chopped spinach (thawed)
1 package Knor's Vegetable Soup Mix
500 ml plain unsweetened yogurt
1 can water chestnuts
tabasco sauce to taste (optional)
  1. In a bowl mix together the yogurt and soup mix.
  2. Squeeze out the excess water from the spinach and add to the bowl.
  3. Drain and rinse the water chestnuts.  Chop them up into small pieces and add them to the bowl.
  4. Mix everything together and taste, if you would like to add some spice put in tabasco sauce to your liking.
  5. Serve with your choice of veggies or keep in the fridge.

Wednesday 19 December 2012

Creamy Mushroom Sauce

So like many nights in the past I was standing in the kitchen unsure of what to make for dinner.  I hadn't gone grocery shopping in a while and I was trying to use up the last bit of produce in the fridge before going to the market to restock the fridge.  This time of the year we eat out so much at parties that home cooked meals don't happen to frequently do we don't keep much in the fridge.  When I opened the fridge I found some mushrooms that needed to be enjoyed soon so I thought I would hit up google to find a basic recipe (remember I am having a little case of the old mother hub bard problem) to use them up in.
I was very happy to come across this recipe and I will definitely use it in the future.  With only a few ingredients it made a delicious pasta sauce that did not require too much effort.  I love the fact that I could use my food processor to chop up the onion and garlic.

Creamy Mushroom Sauce

5 or 6 mushrooms
garlic (use your judgement as to how garlicky you like it)
small bunch of parsley
1 cup of cream or 3% milk
1/4 cup butter or olive oil
salt and pepper to taste
  1. In a food processor place the mushrooms, garlic and parsley. Process until everything is in small pieces.
  2. Cook this mixture with the butter/olive oil in a frying pan until the moisture has absorbed.
  3. Add the cream, salt and pepper.  Reduce until it is at your desired consistency.
  4. Serve over fresh pasta with so parmesan.
Adapted from here.

Tuesday 18 December 2012

Banana Walnut Muffins

I love eating bananas but I am very particular about their ripeness when I eat them and with all of the Christmas parties I have attended this year I had some ones that did not get eaten during their prime.  So  I decided it was time to make some muffins since I enjoy having them on hand for a quick snack.  My husband and I really enjoyed these but my dog wasn't a big fan of the nuts.  He decided to help himself to one when I left them unattended while they were out cooling.

Banana Walnut Muffins

1 cup whole wheat flour
1/3 cup sugar
1/2 tsp baking powder
1/4 tsp salt
2 bananas
1/4 cup milk 
1 egg
1/2 tsp vanilla
2/3 cup walnuts

  1.  Combine the whole wheat flour, sugar, baking powder and salt. 
  2. In a separate bowl put in the bananas and cut in to small pieces with a fork. Smash the bananas with your fork so that it mostly mashed but with some small chunks of bananas.  
  3. Add in the egg, vanilla, and milk to the banana mixture. 
  4. Combine the dry and wet ingredients and also the walnuts. Mix briefly.
  5.  Pour the batter into a nonstick muffin pan. If you really like walnuts, sprinkle some extra pieces on top of the batter before baking. 
  6. Bake at 350 degrees F for 30 to 40 minutes. Make sure you take the muffins out of the tins right away, otherwise it can be very challenging to get them out in one piece.

Monday 17 December 2012

Butter Tarts

Butter tarts are wonderful year round but they were always a special treat my mom would make at Christmas.  I have yet to taste a better recipe.  Growing up, most of my family members didn't like nut or coconut but you are welcome to add them to this recipe if you like.  This recipe also freezes very well.

1 package frozen unsweetened pastry tart shells

1 cup of white sugar
1 cup seedless raisins
2 eggs
1 Tsp. vanilla
1/3 butter
4Tbsps. Cream or Half & Half
  1. Preheat the oven to 375 F. 
  2. In a saucepan, mix together sugar, raisins, vanilla, butter and cream.  
  3. Beat the eggs and add to the mixture.  
  4. Boil at medium heat for five minutes.
  5. Place the uncooked tart shells on a cookie sheet and fill the shells with the mixture.
  6. Bake for 15 minutes.


Roasted Butternut Squash Soup

Butternut squash is one of my preferred guards and I had a big one to use up so I thought I would look for a new recipe.  I came across this one and it worked out well because I already had most of these items in my fridge.  I am glad I decided to make a double batch, I am looking forward to enjoying some on an evening where cooking is the last thing on my mind.

Roasted Butternut Squash Soup

1 small butternut squash, peeled and chunked
2 leeks, cut into small chunks
4 celery ribs, cut into small chunks
1 red onion, peeled and cut into small chunks
2 large carrots, cut into chunks
2 cloves garlic, roughly chopped
1 tbsp olive oil
1/4 tsp cinnamon
1/4 tsp cloves
1/8 tsp nutmeg
1/8 tsp ginger
2 bay leaves
1/4 tsp thyme
1/4 tsp rosemary
1/4 cup maple syrup
6 cups vegetable stock
1 tsp cider vinegar
Salt and pepper to taste

  1. Preheat oven to 400 degrees.
  2. Place the butternut squash, leeks, celery, onion, carrots, garlic, olive oil, cinnamon, nutmeg, ginger and cloves in a large bowl and toss until evenly mixed.
  3. Spread the vegetables on a large greased baking sheet and roast for 25min, or until browned.
  4. Transfer the vegetable mixture to a large pot and add the bay leaf, thyme, rosemary, maple syrup, vegetable stock and cider vinegar.
  5. Bring to a boil then lower the heat and simmer for 30min or until the vegetables are tender.
  6. Remove from heat and remove the bay leaf. Puree until smooth and strain to remove any chunks if desired.
  7. Return to the heat adjusting the consistency with water if required and adding salt and pepper to taste.

Sunday 16 December 2012

Mrs. H's Cranberry Orange Bread

This is a recipe that is a favourite in the neighbourhood I grew up in.  Every year one of the grade two teachers at the local school would have the parents come in and help her students make this bread.  This teacher retired recently and I remember talking to many of her past students and they all remember this bread and many of them still make it on a regular basis.  It tastes amazing and it is one I look forward to making and enjoying every year.  I hope you enjoy it as much as I do!

Mrs. H's Cranberry Orange Bread

2 cups sifted all-purpose flour
1 cup white sugar
1 1/2 teaspoons baking powder
1 teaspoon salt
1/2 teaspoon baking soda
1/4 cup butter
1 egg, beaten
1 teaspoon orange zest
3/4 cup orange juice
1 1/2 cups golden raisins
1 1/2 cups chopped cranberries
  1.   Preheat oven to 350 degrees F (175 degrees C). Spray or grease one 9x5x3 inch loaf pan.
  2. Whisk together the flour, sugar, baking powder, salt and baking soda.
  3. Cut in butter until mixture is crumbly. Add egg, orange peel, and orange juice; stir to mix and fold in raisins and cranberries.
  4. Pour into loaf pan and bake for 70 minutes or until toothpick inserted comes out clean. 
  5. Remove from pan; cool on wire rack.

Chocolate Balls

This is another recipe that is beloved by my family.  It is super easy and one that kids enjoy making.  They are very tasty and I am sure you could add a splash of your favourite liqueur if you feel so inclined.
You can roll these in your choice of powders or coverings, my preferred pick is coconut but you can use icing sugar, graham wafer crumbs, Oreo cookie crumbs, ground nuts or sprinkles to name a few.

Chocolate Balls

1/2 cup butter
1 can condensed milk
2 bakers dark chocolate squares
1 box cookie crumbs (oreo or graham wafer), you will need extra if you are planning to use them as a 
          topping
1 cup topping of choice
  1. In a pot, on low heat melt together the butter, chocolate and condensed milk.  Stir frequently so it doesn't burn.
  2. Add the cookie crumbs and stir until they are thoroughly combined.
  3. Roll into balls with a one inch diameter.  It helps if you have butter on your hands.  Roll the balls in the topping of your choice.
  4. Store in a air tight container.


Friday 14 December 2012

Chocolate Dipped Candied Ginger

This is a great recipe for all you ginger lovers out there! It is very quick to make and easy to enjoy.  I hope the batch I made lasts until Christmas because I am hoping to use it as part of the dessert.

Chocolate Dipped Candied Ginger

24 pieces candied ginger
1/2 cup belgian chocolate
  1. Melt the chocolate in a bowl in a hot water bath.  Once the chocolate begins to melt remove from the water and stir the chocolate until it has all melted.  If you need to, return it to the hot water bath.
  2. Dipp the candied ginger into the chocolate and let it harden on a parchment lined cookie sheet for about an hour.

Wednesday 12 December 2012

Gingerbread

For me, it is just not quite Christmas without making gingerbread.  I love the years when my husband have time to make our own gingerbread house but unfortunately this is not one of those years.  This recipe has never failed in the past for gingerbread houses, much better than the store bought kits.  It also works well for making Christmas tree ornaments, especially if you double up on the spices.
If you happen to have any leftover cuttings from making a gingerbread house or scrap dough bake it, I will post a great Maple Gingerbread Ice Cream my husband makes.

Gingerbread

3 cups flour
1/2 tsp baking powder
1 tbsp gingerbread spice
1/2 tsp salt
1/2 cup butter
1/2 cup packed brown sugar
1 egg
1/2 cup molasses
  1. Sift together the first 4 ingredients together in a bowl.
  2. Cream together the butter and the sugar until they are light and fluffy.  Beat in the egg and molasses.
  3. Add the dry ingredients into the creamed mixture and mix until well-combined.
  4. Form the dough into two balls and flatten into discs.  Chill for 30 minutes.
  5. Preheat the oven to 350.
  6. Roll out the dough on a floured surface and cut into desired shapes if you are making cookies.  For a gingerbread house roll it out onto a pan.
  7. Bake for 10-12 minutes.  For a house, cut the gingerbread while it is still hot into your desired shapes for the house.
  8. Decorate and enjoy.

Royal Icing

2 egg whites
5 cups icing sugar
  1. In a large bowl, lightly whisk egg whites.
  2. Gradually beat in the icing sugar.  The icing should be smooth and stand in firm peaks.
*Be careful not to over whip your icing because it will crack when it dries.

Tuesday 11 December 2012

Snowballs


What a treat!  These little guys are a huge hit with my family.  Unfortunately my Grandmother has forbid me from bringing them to any family function she is attending for she lacks the will power to have just one!  When making them try to keep them to the size of a cherry tomato because they are on the sweet side.

Snowballs

1/2 cup icing sugar
1/2 cup butter
1/2 cup shortening
1/2 tsp vanilla
2 cups all purpose flour
1/2 tsp salt
1 cup coconut flakes, for rolling
Glaze
2 1/4 cups icing sugar
3 tbsp hot water
  1. Preheat the oven to 350 F.
  2. Cream together the butter, shortening, icing sugar and vanilla.
  3. Add flour and salt.  Mix to form a smooth dough.
  4. Roll into cherry tomato size balls and place on a cookie sheet.  Bake for 8-10 minutes.
  5. Cool, coat with glaze, and roll in coconut.  Let the glaze dry thoroughly before storing in an air tight container.

Sunday 9 December 2012

Chocolate Cookie Cut-outs

Wow, these cookies are sweet chocolatie goodness!  Nothing beats home made cookies fresh out of the oven and these are no exception.  I love raw cookie dough and this is one that takes great so you have to be very disciplined or double the recipe if you want to have any cookies by the time you are done.  If you like you can even make your own 'oreo' cookies by putting some icing between the cookies.

Chocolate Cookie Cut-outs

2 3/4 cups flour
1/2 cup cocoa powder
2 1/12 tsp baking powder
pinch of salt
3/4 cup butter (room temperature)
1 1/2 cups sugar
2 eggs
1 tbsp milk
  1. Sift together the flour, cocoa powder, baking powder and salt.
  2. In a separate bowl, cream together the butter, sugar and vanilla.
  3. Beat in the eggs one at a time and mix until smooth.  Stir the milk.
  4. Add the dry ingredients into the creamed mixture and beat together until it is smooth.
  5. Refrigerate the dough for about an hour.
  6. Preheat the oven to 350 F.
  7. On a floured surface roll out the dough and cut it into your desired shapes.
  8. Bake for 15 minutes and let them cool before you decorate.

Monday 3 December 2012

Gingerbread Crackle Cookies

Every year I like to try at least one new cookie recipe at Christmas time and this is the first new one I have tried this year.  These turned out spectacular!  I love how they made my house smell like Christmas while I was baking them.  I like how you don't have to wait for the dough to chill before baking them.  All you have to do is roll the balls up, roll them in sugar and then stick them in the oven.  Very simple and straight forward.  I had someone working on replacing the carpet when I made them and he couldn't resist.  He said that he approved them.


Gingerbread Crackle Cookies


  • 2 cups (500 ml) all-purpose flour
  • 2 tsp (10 ml) baking soda
  • 2 tsp (10 ml) gingerbread spices
  • 1/2 tsp (2.5 ml) salt
  • 3/4 cup (180 ml) shortening
  • 1/2 cup (125 ml) firmly packed brown sugar
  • 3/4 cup (180 ml) white sugar, divided (reserve 1/4 cup (60 ml) for rolling)
  • 1 egg
  • 3 Tbsp (45 ml) molasses
  • 2 tsp (10 ml) Vanilla
  • 1. Preheat oven to 350° F (175° C).
    2. Whisk first 4 ingredients in a mixing bowl and set aside.
    3. In a second bowl, cream shortening with brown sugar and 1/2 cup (125 ml) white sugar.
    4. Stir in egg, molasses and Vanilla Extract.
    5. Gradually add dry ingredients, beating well after each addition.
    6. Place remaining white sugar in a shallow bowl. Form cookies by rolling into 1” (2.5 cm) balls; roll in sugar and place 2” (5 cm) apart on  a cookie sheet lined with parchment paper.
    7. Bake for 10 minutes, or until cookies ‘crackle’ on top. Cool before storing.

Sunday 2 December 2012

Drunken Chorizo Sausage

This is another family favourite at Christmas time.  This is a great tasting impressive appetizer that doesn't require much as far as ingredients and preparation goes but vanishes quickly when it is put out.  I like that it is one that I can make in advance and keep it warm in the oven for when guests arrive.

Drunken Chorizo Sausage

1 Chorizo or Garlic Sausage
1 bottle of red wine
3 or 4 minced garlic cloves
toothpicks for serving
  1. Cut the sausage into into 1/2 inch slices.
  2. In a frying pan, put the sausage, garlic and wine and allow it to simmer over medium heat.  As the wine is absorbed, add more until you achieve the flavour you desire.
  3. Serve on toothpicks hot.  You can keep them in a dish in the oven if you make them ahead of time.

Saturday 1 December 2012

Rum Balls

One of my favourite treats during the holidays is home made rum balls.  I am not sure why, they were not a staple in my families house when it came to holiday baking and I think we only ever got them if they were a gift from a family friend or a client of my dad's.  At least to my recollection and I could be completely wrong but I belief an old family friend, who taught with my Grandma a long time ago, would give them to my family.  Regardless of where they came from, I remember taking a bite and closing my eyes, savouring the flavour while it melted in my mouth.  To me this is the only way to truly enjoy a rum ball.
Another reason I enjoy rum balls is that you can make a big batch early in the season and keep them in the freezer to pull out as you need them.
I am sure there are better recipes out there but this is the one I have used for the past couple of years and I find the end product quite enjoyable.  I know the first time I made them I was surprised at how straight forward they were to make.
Remember when you are making these that the quality of the rum will be reflected in the taste of the rum ball.  If you use a cheap rum with not the greatest flavour don't wonder why they rum balls are missing the true rum flavour.

Rum Balls

1/2 cup dark belgian chocolate
1/2 cup sugar
1/3 dark rum
1/4 cup corn syrup
2 1/2 chocolate cookie crumbs (ex oreo cookie crumbs)
2 tsp cinnamon
3/4 cup finely chopped nuts
powder or sprinkles of your choice for rolling (ex cocoa powder, icing sugar, chocolate sprinkles)
  1. Melt the chocolate in a bowl placed in a hot water bath.
  2. Mix in the sugar, rum and corn syrup.
  3. In a separate bowl mix together the dry ingredients so they are blended well.  Then stir them into the chocolate mixture. Continue stirring until the mixture has a uniform consistency.
  4. Scrape down the sides of the bowl, cover and refrigerate until it is firm.
  5. Form into small balls, no bigger than a walnut shell, and roll in your coating(s) of choice.
  6. Layer between parchment paper in an air tight container and store them in the freezer for up to a month.


Friday 30 November 2012

Nuts and Bolts

For me, it just isn't Christmas without Nuts and Bolts.  They have always been a staple and I can't remember a Christmas without them and I hope I never will!

Tomorrow, my husband and I are having our annual Wine and Cheese Potluck so I thought I had better make a batch to prepare for the party.  I love how simple they are and how good they taste.
For storing I always have them in a ziplock freezer bag and store them either in the fridge or the freezer.

Nuts and Bolts

1 box Shreddies
1 box Cherios
1 bag Pretzel sticks
2 boxes Cheese Nibs
1 large bottle of Worcestershire sauce 
1 lb butter
garlic powder, onion powder and tabasco sauce to taste
  1. Preheat the oven to 200.
  2. Mix the first four ingredients in a large roasting pan.  If it isn't big enough, use two.
  3. Melt the other ingredients in a pot.
  4. Pour the melted mixture over the dry ingredients and mix thoroughly.
  5. Place in the oven and cook for 1and 1/2 to 2 hours, stirring every 20 minutes.
  6. Lay out on newspaper covered table to absorb some of the excess liquid.
  7. Store in freezer bags in the fridge or freezer.

Monday 19 November 2012

Turkey Casserole

In my family we often will do a Christmas in November for the family members that cannot make it to actual Christmas.  We had ours this past weekend so I had turkey leftovers to use up.  There was a fair bit so instead of just making a turkey soup I decide to do a turkey casserole as well.  I love making casseroles because it is easy to make twice as much so you can freeze one for later and that is exactly what I did.
The recipe I have posted is for enough for one large casserole dish or it can be divided into two smaller ones.  I hope you enjoy it as much as we did.

Turkey Casserole

1 package egg noodles
3 tbsp butter
3 tbsp flour
3 1/2 cups cold milk
1 can condensed cream of mushroom soup
1 cup diced bell peppers
1 onion
1 tsp garam marsala
1 tsp dried tarragon
1 cup grated pepperjack cheese
3 cups cubed skinless turkey
enough crushed potato chips to cover the top


  1. Preheat oven to 350 degrees F.
  2. Bring a large pot of lightly salted water to a boil. Cook egg noodles in boiling water, stirring occasionally until almost cooked through and still firm to the bite, about 4 minutes. Drain.
  3. Melt butter in a large saucepan over medium heat. Whisk in flour; cook, stirring, until mixture is light golden, about 3 minutes.
  4. Pour milk into butter and flour mixture, whisking constantly. Stir in cream of mushroom soup, red bell pepper, green bell pepper, green onions, garam masala, and dried tarragon. Bring mixture to a simmer, cook for 2 minutes. Remove from heat.
  5. Stir in pepperjack cheese until cheese is melted and incorporated.
  6. Stir pepperjack cheese mixture, turkey meat, and noodles in a large bowl until evenly incorporated. Pour mixture into a large casserole dish. Sprinkle chips on top, pressing down slightly with the tines of a fork. Bake in the preheated oven until casserole top is golden brown and sauce is bubbling, about 30 minutes.


Hazelnut Cake (aka 'The Crunchy Frog')

This is a marvellous dessert that my mother-in-law makes and I have always enjoyed it.  I decided it would be a great dessert for a barbecue I had with some friends the other night because it would allow me to use up some of the wonderful sugared violets my in-laws brought us back from the South of France last year.

A great thing about this dessert is that you can make the cakes in advance and store them between grease-free paper in an air tight container in the freezer to use at a later date.  I love recipes like that.  Especially since it means I can have a gluten free dessert in the freezer on hand for any unexpected guest that may stop by.

The Crunch Frog

6 eggs, separated
6 oz sugar
6 oz hazelnuts
1 L whipping cream

  1. Roast the hazelnuts in the oven to allow the natural oils and flavour to come out.  Do this by putting them on a baking sheet and in the oven for 10-15 minutes at 350 F.
  2. Wrap the nuts in a kitchen towel and allow them to steam for about a minute.  Then rub the nuts between the towel to remove the skins, do not worry if all the skins do not come off.
  3. Break the hazelnuts into small pieces either by using a food processor or placing them in a bag and using a rolling pin.
  4. Combine the egg yolks and sugar into a bowl and mix until blended.  Add the hazelnut pieces and lightly mix.
  5. Beat the egg whites until they are stiff.
  6. Fold together the egg whites and the egg yolk mixture.
  7. Divide the batter into two greased and floured 8 inch round cake tins and bake at 375 F for about 30-40 minutes.  The cake will rise and fall.
  8. Let the cakes cool and remove from the pans.  Slice each cake in half to make 4 layers.  Ice each layer with whipping cream and decorate.  I like to put candied flower blossoms on the top.

Tuesday 13 November 2012

Spiced Stuffed Mushroom Caps

I am a sucker for stuffed mushroom caps and they would be a weekly menu item at my house if they were a little healthier.  I usually make them when I have some mushrooms in the fridge that need to be used up.
I wanted to stray from my regular recipe so I looked online and found this one.  It was a little on the spicy side for my liking but that would be simple enough to fix but cutting the amount of cayenne pepper in them.  I hope you like them.

Spiced Stuffed Mushroom Caps

12 whole fresh mushrooms
1 tbsp vegetable oil
1 tbsp minced garlic
1 (8 oz) package of cream cheese
1/4 cup grated parmesan cheese
1/4 tsp ground black pepper
1/4 tsp onion powder
1/4 tsp ground cayenne pepper


1.
Bring a large pot of lightly salted water to a boil. Add ziti pasta, and cook until al dente, about 8 minutes; drain.
2.
In a large skillet, brown onion and ground beef over medium heat. Add spaghetti sauce, and simmer 15 minutes.
3.
Preheat the oven to 350 degrees F (175 degrees C). Butter a 9x13 inch baking dish. Layer as follows: 1/2 of the ziti, Provolone cheese, sour cream, 1/2 sauce mixture, remaining ziti, mozzarella cheese and remaining sauce mixture. Top with grated Parmesan cheese.
4.
Bake for 30 minutes in the preheated oven, or until cheeses are melted.

Monday 29 October 2012

Roasted Tomato Soup

I love to make soups in the fall, they are so easy and a great way to warm up on a chilly day.  Soups are also so easy to make and freeze well so you don't have to eat the whole pot at once.  This year we probably had close to fifteen tomato plants in our backyard that turned into more of a tomato hedge.  I had so many to use up I thought that making a soup would be a great way to use up the tomatoes and enjoy them when we can no longer eat them fresh off the vine.  Plus I love tomato soup.  It makes me think of rainy days spent at my Grandma's house when I was growing up.  This isn't her recipe but any tomato soup brings back the memories.
This is an easy recipe to make and one you can do while making something else for dinner.  It has a lovely flavour to it and a wonderful thick consistency.  If you prefer a thinner soup simply add more stock to it.

Roasted Tomato Soup

5 large tomatoes, cut into 3/4" slices1 onion, cut into 1/2" slices1/2 jalapeno, cut in half lengthwise, seeded2 bell peppers, seeded, cut into 4 piecesolive oil1/4 teaspoon smoked paprika1/2 teaspoon garlic powder3/4 teaspoon salt (or to taste)freshly ground black pepper2 cups vegetable broth1/4 cup grated parmesan cheese (plus additional cheese for garnishing)few tablespoons of heavy cream or creme fraiche (optional)
  1. Preheat your oven to 375.  On cookie sheets or in a roasting pan place the vegetables and sprinkle with olive oil.  Roast them for 20 to 30 minutes.
  2. Blend the roasted vegetables in a standard blender and add them to a pot.  Add the remaining ingredients.  If you are using an immersion hand blender add all the ingredients into the pot and then blend.  
  3. Bring the soup to a boil and then serve.  Garnish with parmesan cheese and or cream if you desire.

Saturday 20 October 2012

Swiss Chard with Pine Nuts and Garlic

So this year we decided to grow some chard in our backyard this year and we still have a lot left to use up before the frost comes so when I had my family over for dinner I thought it would be a great time to use some of it up.  I wanted to try something different so I decided to search for a new recipe.
This recipe was fairly easy to through together last minute while my husband was carving the beef.  I hope you enjoy it.

Swiss Chard with Pine Nuts and Pan Roasted Garlic

2 tbsp oliveoil
3 cloves garlic
1/3 pine nuts
1 bunch Swiss chard
1/4 cup water
salt and pepper
dash of lemon juice
  1. Heat olive oil in a large sauté pan over medium heat.  
  2. Slice garlic very thinly and add to the oil, cooking until it is lightly browned.
  3. Add the pine nuts and sauté until golden brown.  Remove the garlic and pine nuts and set aside.
  4. Trim stems from the chard and cut them into bite size pieces.  Add the stems to the pan with water and simmer until the water has evaporated.
  5. Chop chard leaves roughly and add to pan.  Season lightly and toss them until they wilt. 
  6. Return the garlic and pine nuts to the pan and sprinkle with lemon juice.  Adjust the seasoning and serve.

Tuesday 2 October 2012

Green Tomato Chutney

I hate to waste good produce that I have been working hard to grow all year.  This year we had a late start with our tomatoes because of lack of sun and with fall coming I new that the rains would be coming soon.  The other day it looked as if it was going to start to rain soon so I called on my husband to help me pick the many unripened tomatoes in our back yard.  The whole process took about two hours and now anywhere there is a window that gets sun in our house there are a bunch of tomatoes laying in front of it, just waiting for the chance to ripen.

The past couple of years I have had more green tomatoes than window space and so I have started to make green tomato chutney with the extras.  I usually do this with the cherry and smaller tomatoes because they require less chopping.

Green Tomato Chutney

1 3/4 lb tomatoes, cut into chunks
2 granny smith apples, cored and cut into chunks
1 cup sliced shallots
2 dried chillies, seeded and finely chopped
1 inch grated ginger
1 cup apple cider vinegar
1 cup raisins
1 1/2 brown sugar
1 tbsp mustard seed
1 tsp ground cardamon
1/2 tsp all spice
1 orange zested
  1. Mix together all the ingredients in a non-reactive pot.
  2. Bring to a boil and then reduce heat to a low boil, stirring frequently for 45 minutes.
  3. Pour into sterilized jars and process according to the size of your jar.
* this recipe makes about a 1 litre of chutney

Friday 21 September 2012

Blueberry Basil Vinegar

I am always looking for new and inventive ways to use the different produce we grow at the farm.  Blueberries are one thing we have a lot of, especially since this year we added another 16 bushes to our collection as well as five more of the pink lemonade blueberries.  I already had a knew a lot of different ways to use them but I wanted to try something a little different.  I was very excited when I found a blog called Creating Nirvana because it has a lot of really great recipes that I look forward to trying.  This is one that I decided to start with.
It takes time because you have to allow it to sit for four weeks before canning it but I canned mine last night and it was definitely worth the wait!  I am looking forward to using it in salads all winter when I don't have fresh blueberries available to sprinkle on my salad.

Blueberry Basil Vinegar

4 cups blueberries
4 cups white wine vinegar
1 cup loosely packed basil
1 lemon, zested
  1. In a large glass bowl, crush the blueberries.
  2. Add the remaining ingredients to the bowl and stir to combine.
  3. Cover the bowl with plastic wrap.
  4. Keep the bowl in a cool, dark place for 4 weeks.
  5. Stir the contents every 2 or 3 days.
  6. Using a fine mesh strainer, strain the vinegar into a pot.
  7. Heat the vinegar to 180 F.
  8. Ladle into sterilized jars and leave 1/4 inch of head space.
  9. Apply the lids and process in a hot water canner for 10 minutes.
***If you like you can add some fresh blueberries before you boil the vinegar.
***Makes about 2 pints.

Thursday 20 September 2012

Healthier Zucchini Brownie

I am constantly looking for new ideas on how to use up the many zucchinis I grow in a summer.  I only have so much room in my freezer for grated zucchini to use during the year.  I was excited to find this recipe because it is always nice to find a desserts on the healthier side of things.  This recipe has zucchini, apples and bananas in it.  The addition of these keep the brownie unbelievably moist.  The people I shared this with all seemed to really enjoy it.

Healthier Zucchini Brownie

1/2 apple sauce
2 small or medium mashed bananas
1 1/2 cup sugar
2 tsp vanilla
1/2 cup cocoa powder
1 1/2 tsp baking soda
1/2 tsp salt
2 cups finely shredded zucchini
2 cups flour
1/2 cup walnut pieces

  1. Preheat the oven to 350 and grease a 9x13 pan.
  2. Mix together the apple sauce, mashed bananas and sugar.
  3. Add the vanilla and cocoa powder and stir until combined.
  4. Then add the baking soda, salt and zucchini.  Mix together.
  5. Finally add the flour and walnuts, stirring until everything is well blended.
  6. Spread evenly into the pan and bake for about 25 minutes.  The brownie should spring back when it is touched.

Wednesday 5 September 2012

Orange Almond Biscotti

Well the weather making it feel like fall is on the way and with the cooler weather around the corner I like to enjoy a nice warm drink after being outside in the cold.  I am not a coffee drinker, I prefer hot cocoa or a nice apple cider.  When I am enjoying my warm drink the kid in me still love to dunk in a cookie or a biscotti.  I especially like how the almond and orange in this recipe enhances the flavour of the drink and vice versa!
The first time I made these I was really surprised at how easy the were to make.

Orange Almond Biscotti

1 3/4 cups flour
2 tsp baking powder
2 oranges, zested 
3/4 cup sliced almonds
2 eggs
3/4 cup sugar
1/3 cup butter,  melted
1/2 tsp almond extract
1 egg white, slightly beaten
decorating sugar (optional)
  1. Preheat the oven to 350 F.
  2. Combine the flour, baking powder, zest and almonds.
  3. Beat the eggs with the sugar, butter and almond extract.  Combine both mixtures until the form a sticky dough.
  4. Form the dough into a long ball on a lightly floured surface.  Divide the dough into two.  
  5. On a parchment lined baking sheet, make two long logs.  Brush with the egg whites and sprinkle with the decorating sugar.
  6. Bake for 20 minutes.
  7. Allow it to cool for five minutes before transferring to a cutting board.  Slice diagonally into 3/4 inch pieces.  Return them to the baking sheet with the same side upright and cook for another 20 minutes, or until golden.
  8. Transfer to a cooling rack and then store in an airtight container for up to two weeks.

Fruit and Nut Chocolate Bark

I am a bit of a chocoholic and I enjoy Dairy Milk's Fruit & Nut bar as a treat every so often but I was really excited to find this recipe.  It isn't hard and I am sure I could figure it out myself but sometimes you need to see a recipe before you decide to make it.
I also like to pretend it is a little healthier when I make it than the store bought bar because I like to use good quality chocolate and different fruits that I have dried myself.  In my mind the home made bark cuts out at least some of the preservatives and saturated far.  Even if you don't agree with me please let me continue in my ignorance.  As they say, ignorance is bliss! ;)

Fruit and Nut Chocolate Bark

3 cups dark Belgian chocolate
3/4 cup mixed dried fruit
3/4 cup toasted almonds
  1. Melt the chocolate in a bowl in a hot water bath.  Once the chocolate begins to melt remove from the water and stir the chocolate until it has all melted.  If you need to, return it to the hot water bath.
  2. Mix in the dried fruit and almonds.
  3. Spread evenly onto a cookie sheet lined with parchment paper and allow it to cool and harden.
  4. Break it up into pieces and enjoy for yourself or share it with others.

Roasted Carrot Soup

I have always found going back to school a really busy time trying to adapt to the new schedule.  The past couple of years I have started to try and make a pot of soup a week so I can take it with me for lunch or on a busy night I can have it for dinner.  This was the first pot I have made for the year and it turned out marvelously so I thought I would share the recipe.

Roasted Carrot Soup

Preheat your oven to 400.
Wash and cut up 5 pounds of carrots. (I cut them into about 3 inch peices)
Cut 2 large onions into chunks.
Place the vegetables in a large roasting pan and drizzle with olive oil.
Sprinkle the vegetables with 2 Tbsp of vegetable seasoning.
Place the pan in the oven to roast for an hour, tossing the vegetables a few times.
Prepare 8 cups of Bouillon
In batches puree the vegetables together with the bouillon.

It makes roughly 12 cups of a thick soup.  If you prefer a thinner soup just add more bouillon.  You could also add some ginger, garlic and turnip if you wanted.

Sunday 26 August 2012

Cranberry Orange Muffins

I love the combination of cranberries and oranges, the flavours blend so well together.  It is almost like they were meant to be joined together in baking because they complement each other beautifully. 
This is a fairly healthy muffins proving to be a good source of both fiber and vitamin C.  As I have said before I love having muffins in the freezer to pull out for a quick breakfast or a snack before running out the door.

Cranberry Orange Muffins

1 1/4 cups bran cereal
1 1/3 cups low fat plain yogurt
1 egg
1 tbsp orange zest
1/2 cup orange juice 
1/2 cup honey
1/4 cup vegetable oil or apple sauce
2 cups whole wheat flour
2 tsp baking powder
1/2 tsp baking soda
1/2 tsp salt
1 cup cranberries
  1. Preheat the oven to 375F and lightly grease or line a muffin tin.
  2. Combine the cereal and yogurt in a mixing bowl and let it sit for 5 minutes.
  3. Add in the orange zest, orange juice, honey and vegetable oil and stir until mixes well.
  4. In a separate mixing bowl, combine the dry ingredients and cranberries.  Stir in the wet ingredients until just mixed, it should still be lumpy.
  5. Spoon into the muffin tins.
  6. Bake for 25 minutes or until they have set and the tops are golden.


Thursday 23 August 2012

Cheesy Zucchini Bread

Here is yet another way to use up some of the summertime zucchini goodness.  The zucchini helps keep the bread nice and moist.  I really enjoy this bread and I think it is a perfect match with some nice soup in the winter.  In the summer I will make a bunch to put in the deep freezer and take it out throughout the winter when I make soups at least once a week. It tastes great on its own, warmed with some butter.

Cheesy Zucchini Bread

3 cups flour
1/2 cup sugar
1 tbsp baking powder
1 tsp sea salt
1/2 tsp baking soda
2 tsp onion flakes
1 cup grated zucchini
1/3 cup melted butter
2 eggs, beaten
1 cup butter milk
3 tbsp parmesan cheese, plus extra for sprinkling on top
  1. Preheat the oven to 350 F. Grease and flour a 9"x5" loaf pan or some mini loaf pans.
  2. Combine the toasted onion and grated zucchini, allow it to sit for at least 10 minutes.
  3. Combine and mix together the dry ingredients.
  4. Stir in the eggs, butter and butter milk and parmesan cheese into the flour mixture.  Add the zucchini mixture and stir until just combined
  5. Pour into the loaf pan(s) and sprinkle the tops with extra parmesan.
  6. Bake for 50 - 65 minutes for a regular loaf and 25-35 minutes for mini loafs.  (It is ready when it passes the tooth pick test)

Wednesday 22 August 2012

Christmas Relish

Well right now I almost have more zucchinis than I care to deal with but I have lots of recipes I would like to try and only a limited amount of time when I have an ample supply of them from the garden.  When I found this recipe in my zucchini cook book I knew it was a perfect on for me to try because at Christmas I like to give my family home made gifts.  I am very happy with how it turned out and I am sure once I gift it I will get requests for more!  This is another great recipe of

Christmas Relish

12 cups grated zucchini
2 grated green peppers
2 chopped red peppers
4 cups coarsely chopped onion
1/3 cup pickling salt
1 tsp turmeric powder
1 tsp curry powder
1 tsp celery seed
1 tbsp corn starch
1/2 tsp pepper
3 cups vinegar
4 1/2 cups sugar

Day 1

  1. In a large bowl or pan mix together the prepared vegetables and pickling salt.  Let stand overnight.

Day 2

  1. Drain the vegetables and rinse with cold water.
  2. Mix together the rest of the ingredients into a large pot.
  3. Add the vegetables and boil for 20 minutes.
  4. Pour into sterilized jars and seal.

Tuesday 21 August 2012

Zucchini Relish

Zucchinis are great and easy to grow as long as you don't have too many slugs around.  A problem some people face if finding enough different recipes to use them in, especially the monster baseball bat ones.  Last year I started making Zucchini Relish and I was not able to make enough of it to keep my family satisfied throughout the year.  Personally I am not a huge fan of relish in general unless it is on a hotdog or hamburger but my family will eat it will bread, crackers or cheese.  I hope you enjoy it as much as they do.

Zucchini Relish

4 stalks celery, chopped
10 cups grated zucchini
4 large onions, chopped
1 red pepper, chopped
1/2 cup pickling salt
3 cups vinegar
3 1/4 cups sugar
2 1/2 tbsp celery seed
2 1/2 tbsp mustard seed
2 tsp turmeric powder
2 tbsp corn starch
1/2 vinegar

Day 1

Combine the vegetables and pickling salt in a large stainless steel bowl or pan.  Let them sit overnight.

Day 2

  1. Drain the vegetables and rinse them well.
  2. In a large pot bring the vinegar (3 cups), sugar and seasonings to a boil.
  3. Remove from heat and add the vegetables.  Let it stand for two hours.
  4. Return to the stove and bring to a boil.  
  5. Dissolve the cornstarch in vinegar (1/2 cup) and add it to the boiling mixture.  Allow everything to simmer for 15 minutes.
  6. Spoon into sterilized jars and seal.
  7. Process in a water bather for 20 minutes.
*** Makes about 15 half pints/500 mL jars

Thursday 16 August 2012

Lemon Lavender Shortbread

If you have lavender in your garden and wonder what to do with the flowers when you cut them back.  This is a great way to use up some of them.  
These cookies are to die for!  Like most shortbread all you have to do is let this cookie melt in your mouth and enjoy the flavour medley.  I will often close my eyes and savour the taste.  The lavender adds a wonderful flavour.  I have made this recipe several times and I have family and friends who ask when I am going to make some more.  

Lemon Lavender Shortbread


  • 1/4 lb butter, at room temperature
  • 1/3 cup sugar
  • 1/2 tsp salt
  • 1 tsp lavender
  • 1 tsp fresh lemon zest
  • 1 cup all-purpose flour
  • 1. Beat butter, sugar, salt, lavender and lemon zest until light and fluffy.
    2. Add flour and beat until a soft dough results. Cover and refrigerate for 20 minutes.
    3. Roll dough into a 4" (10 cm) diameter log and wrap in a sheet of parchment paper. Chill for 1 hour.
    4. Preheat oven to 325° F (160° C). Slice log into 1/4" thick slices and place on cookie sheet. Bake for 20–25 minutes, until lightly golden at edges.

Tuesday 14 August 2012

Strawberry Balsamic Black Pepper Jam


I love strawberry jam and when I came across this recipe last year I was very excited to try it.  I have use balsamic vinegar and black pepper to enhance the flavour on store bought strawberries before so I could only imagine what it would do for jam!  Last year I had a small strawberry harvest so I only made one batch.  Once it matured the jam went really fast.  I am happy that this year I have plenty of strawberries so I am making my second batch of the year tomorrow.
This jam goes great with fine cheeses, meats or on a nice pice of artisan bread.  I hope you enjoy it as much as I do.

Strawberry Balsamic Black Pepper Jam

4 heaping cups strawberries, washed, hulled and halved
1 1/2 cups sugar
3 tbsp lemon juice
1/4 cup balsamic vinegar
 1/4-1 tsp black pepper corns, cracked

  1. Place the strawberries, sugar and lemon juice in a non-reactive bowl.  Cover the bowl and allow the strawberries to macerate for about 24 horus.
  2. Sterilize the jars and warm the lids.
  3. In a wide, heavy bottomed pot bring the berry mixture to a full rolling boil that can not be stirred down.
  4. Remove the strawberries with a slotted spoon and continue to boil until the liquid begins to thicken.  
  5. Return the strawberries to the pot, and bring it back up to a boil.  Continue to boil, stirring frequently and skimming off any foam, until it reaches the setting point.
  6. Add the vinegar and pepper to taste; a full teaspoon will make quite a hot flavour - even 1/4 tsp will give a good hint of pepper.
  7. let the jam rest on low heat briefly and test to be certain it has reached the setting point, but be careful not to burn the jam.
  8. Ladle into the sterilized jars, leaving 1/4 inch of head space, seal with warm lids and process for 10 minutes at a rolling boil.
  9. Remove the lid and turn off the heat.  Allow the jars to sit in the hot water for another 5 minutes to cool down.
*** Let this jam age for at least a month before trying it to allow the flavours to really mature.